How to Replace Your Cabin Filter for Clean Air?
Replacing your Cabin Filter is essential for maintaining clean air in your vehicle. According to Mike McBride, an automotive expert, "A clean cabin filter can significantly improve air quality." With dust, pollen, and other pollutants easily accumulating, it's vital to give attention to this component.
Changing the cabin filter does not require special tools. However, many drivers overlook this task. They might notice a musty smell or decreased airflow but often ignore the root cause. Plan to check your filter regularly; it could lead to better health and comfort.
Small particles in the air can affect your well-being. A clean cabin filter can make a noticeable difference in your drive. Remember, neglecting this simple maintenance step can lead to undesirable consequences. Embrace the process and take control of your vehicle's air quality.
Understanding the Importance of a Cabin Filter for Air Quality
A cabin filter plays a crucial role in maintaining air quality inside your vehicle. It acts as a barrier against dust, pollen, and other pollutants. When the filter becomes dirty, it can lead to unhealthy air circulating in the cabin. This is particularly concerning for those with allergies or respiratory issues.
When was the last time you checked your cabin filter? Many people overlook this component, but its importance is undeniable. A clogged filter can cause unpleasant odors and reduce airflow. This not only compromises comfort but also the effectiveness of your vehicle's heating and cooling system. Regular inspection and replacement can make a significant difference in your driving experience.
Consider what you breathe in every day. Clean air contributes to better focus and less fatigue while driving. However, ignoring the filter can lead to a buildup of harmful substances. Reflect on your habits. Are you prioritizing air quality in your daily routine? Taking simple steps can lead to cleaner air and a healthier ride.
Air Quality Improvement: Before and After Cabin Filter Replacement
Replacing your cabin filter can significantly improve the air quality inside your vehicle. The chart above illustrates the Air Quality Index (AQI) measured before and after a cabin filter replacement. A lower AQI value indicates cleaner air, highlighting the importance of regular cabin filter maintenance for enhancing in-car air quality.
Identifying the Right Cabin Filter for Your Vehicle's Model
When it comes to maintaining clean air in your vehicle, choosing the right cabin filter is essential. Various vehicle models require specific filters. Check your owner’s manual for exact specifications. This simple step saves time and ensures effective performance.
To identify the correct cabin filter, take note of the manufacturer’s model number. Filters can differ significantly between models. Forgetting this detail can lead to poor air quality or a fitting issue. Visit an auto parts store and compare the options. Many stores offer guidance to help you select the right filter.
Tips: Always look for filters that have good filtration ratings. Not all filters are created equal. Consider the environment too. If you drive in dusty areas, you might need to change your filter more often. Regular maintenance pays off in cleaner air. Keep an eye on the filter replacement interval. Ignoring it may lead to allergens and pollutants entering your vehicle.
Gathering Tools and Materials Needed for Replacement
Replacing your cabin filter is essential for maintaining clean air in your vehicle. Before you start, gather the necessary tools and materials to make the process smooth. You will need a new cabin filter, a screwdriver (flat-head or Phillips depending on your vehicle), and gloves. Some vehicles may also require pliers to remove certain clips.
Studies indicate that dirty cabin filters can reduce airflow by 15% and may increase allergens inside your vehicle. This can lead to uncomfortable driving conditions, especially for those with allergies. Ensure you choose a quality filter to maintain optimal air quality.
**Tips:** Check your owner’s manual for specific details on filter location. It can save you time and trouble. Also, don’t forget to clean the area where the filter sits. Dust accumulation can counteract the effectiveness of your new filter. Lastly, consider replacing your cabin filter every 12,000 to 15,000 miles, or more frequently in dusty environments.
How to Replace Your Cabin Filter for Clean Air? - Gathering Tools and Materials Needed for Replacement
| Tool/Material | Purpose | Quantity Needed |
| Screwdriver (Flat/Philips) | To remove screws securing the cabin filter cover | 1 |
| New Cabin Filter | To replace the old, clogged filter | 1 |
| Vacuum Cleaner | To clean debris from the filter housing | 1 |
| Gloves | To keep hands clean and protected | 1 pair |
| Safety Goggles | To protect eyes from dust and debris | 1 |
| Clean Cloth | For wiping surfaces and cleaning any residual dust | 1 |
Step-by-Step Guide to Removing the Old Cabin Filter
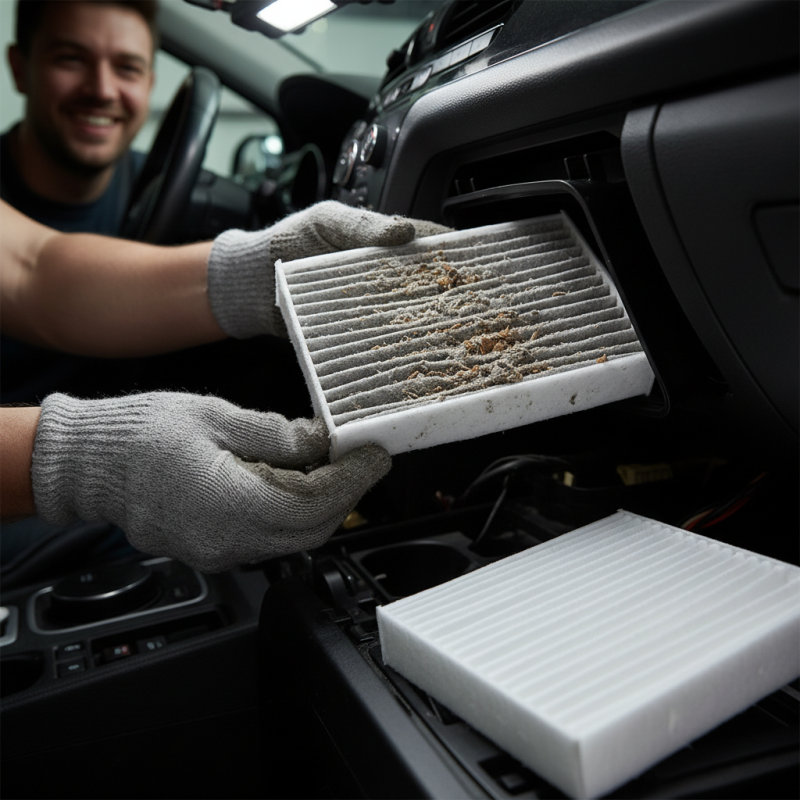
Replacing your cabin filter is essential for maintaining air quality inside your vehicle. A clean filter can significantly reduce airborne pollutants. Studies show that a clogged filter can allow up to 60% less air through, impacting your comfort. When removing the old cabin filter, be cautious. It can accumulate dust, pollen, and even mold.
To start, locate the cabin filter, usually found behind the glove compartment. Open it carefully to avoid damaging any clips. Once exposed, gently pull out the old filter. Look for any debris stuck inside the housing. This buildup can affect airflow, creating a musty odor over time. If the filter is discolored, it's time to replace it.
After removing the old filter, check for leaks in the system. Any air leaks can diminish the effectiveness of your new filter. Installing the new filter is as simple as reversing the removal process. Make sure it fits snugly to prevent dust from entering your cabin. Regular replacement can improve air quality by up to 80%, making your drives more pleasant and healthier. Remember, clean air is vital for your wellness on the road.
Installing the New Cabin Filter and Ensuring Proper Fit
When installing a new cabin filter, ensuring a proper fit is crucial for maintaining clean air quality inside your vehicle. A well-fitting cabin filter prevents dust and allergens from entering the cabin. Research indicates that a new filter can reduce particulate matter by up to 90%. This information is especially important for individuals suffering from allergies.
Before beginning installation, check the old filter for wear and tear. A dirty or damaged filter can cause airflow issues. Measure the dimensions of the old filter to ensure that the new one matches. Small discrepancies can hinder its performance. A snug fit is essential; gaps may allow pollutants to bypass filtration entirely.
Tips: Always choose filters that comply with industry standards for maximum efficiency. Installation may seem straightforward, but minor errors can occur. Ensure that the filter is oriented correctly; many filters have an airflow direction indicated on them. Remember, a neglected filter can lead to a musty odor in your cabin. Keeping the filter clean is not just about air quality—it's about your health and comfort. Regular checks can help you identify when it's time for a change.
 English
  Français